DIY Beach Diorama


@iheartcrafts.ca
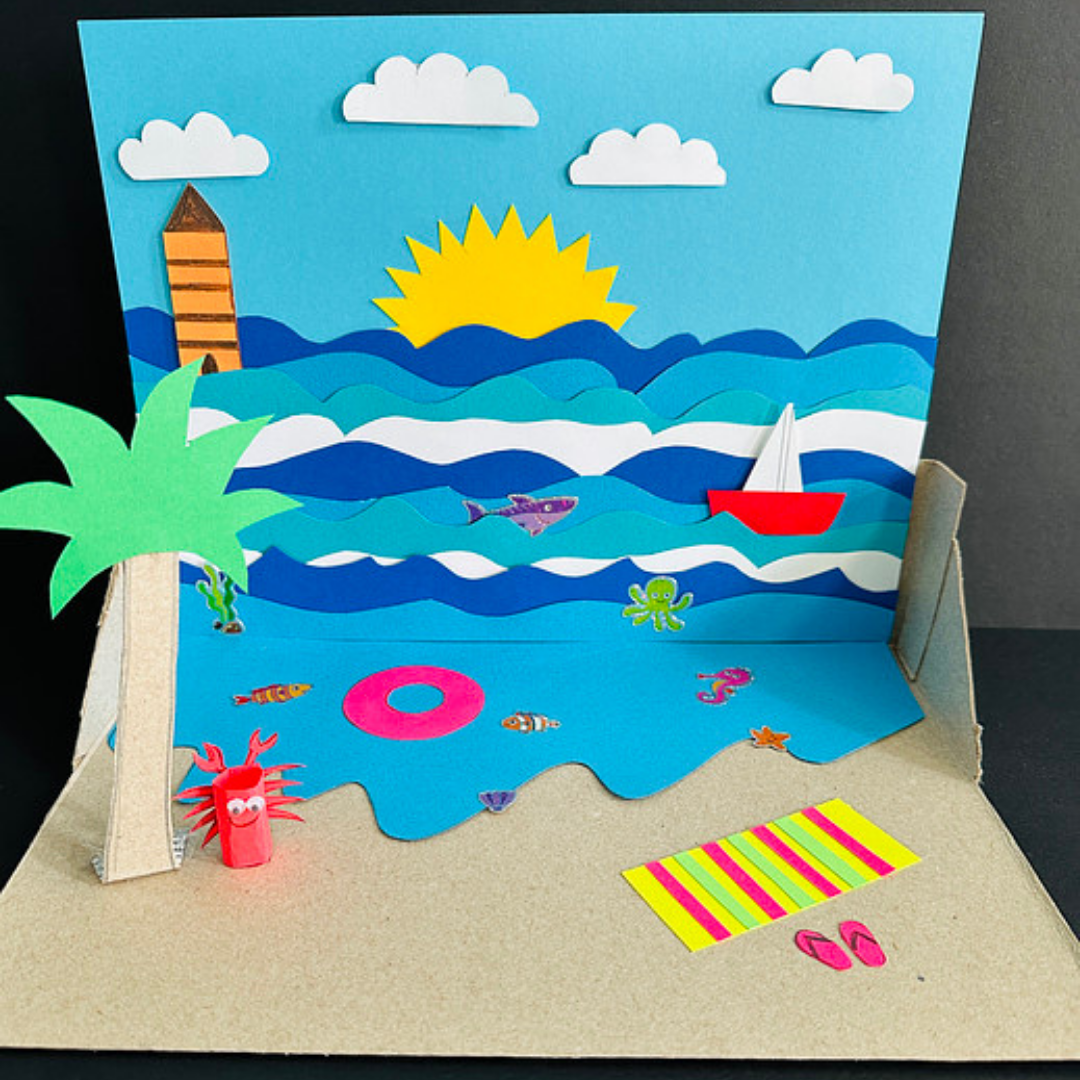
Calling all beach lovers to join me in making this beautiful Beach Diorama!
Going to the beach has been one of my most favorite summer activities ever since I was a kid. How about you? Do you like going to the beach? And if you do, what’s your favorite thing to do there? Is it swimming in the ocean? Making sandcastles? Jumping over waves? Or is it ALL those things? 😊
In today’s blog post I am going to show you how to make this beautiful Beach Diorama step by step, using Astrobrights® Spectrum Cardstock. You’re not only going to love making this wonderful project, but you’ll also enjoy hours of pretend play once its ready.
In addition to the cute little details, I’m showing you how to make today, like the sailboat, the beach towel, the flip flops, or the red crab, you can add any details your heart desires.
So go grab a pack of Astrobrights® Spectrum Cardstock and let’s get crafty! 😊
Supplies:
- Astrobrights® Spectrum Cardstock in your favorite hues
- Cardboard box (once cut, mine measures (11” L x 8” W x 2.5” H)
- Pencil, scissors, ruler, eraser, craft knife (optional)
- Glue gun (optional)
- Glue stick
- Adhesive foam squares OR small ½” pieces of cardboard
- Tape
- 3 round objects to trace circles (approx. 3”, 1.5” and 0.75” in diameter)
- Two googly eyes
- Beach themed stickers (optional)
How to make a Beach Diorama
To Set Up the Diorama Base:
Step 1: Cut a cereal box (or any box) using a craft knife or a pair of scissors, as shown. This will be the base of your beach diorama. The box I have cut out is 11” in length, 8” in depth and 2.5” in height.
To Make the Sun, Clouds, and the Ocean:
Step 1: Pick 5 sheets of cardstock (4 in different hues of blue, and 1 in white). I am using Blast-Off Blue™, Celestial Blue®, Lunar Blue™, Terrestrial Teal™, and Solar White™. Select any one hue of blue to be the sky (I am using Lunar Blue™). Now draw, cut out and attach 3-4 clouds onto the sky using the white cardstock.
Tip: You can attach an adhesive foam square behind each cloud to give a 3D effect. Alternately, you can glue a small piece of cardboard behind each cloud to give the same effect.
Step 2: To make the sun, trace a circle on Solar Yellow™ Cardstock. Draw little triangles for the rays and cut it out. Glue onto the center of the paper.
Step 3: Draw waves on two (of the remaining three) sheets of blue cardstock and on the leftover Solar White™ Cardstock. (I am using Blast-Off Blue™ and Terrestrial Teal™). Space out the waves about 2-3 inches when drawing them. You can have as many or as few waves as you like. Cut them out. Layer and hot glue them onto the sky, creating a beautiful view of the horizon.


To Make the Lighthouse and Boat:
Step 1: Draw the lighthouse and boat as shown and cut them out.
Tip: Attach an adhesive foam square behind the lighthouse for that 3D effect.
Step 2: Once all the elements are glued onto the ‘sky’, hot glue it onto the diorama base, making it stand upright to look like the horizon.
To Make the Water on the Shore, Swim Ring Tube, Beach Towel, and Flip Flops:
Step 1: Take the last piece of blue cardstock (I’m using Celestial blue®), place it horizontally, and draw imperfect waves, like a beach shoreline, and cut it out. Glue onto the diorama base.
If you have any ocean themed stickers, you can add those too.
Step 2: For the swim ring tube, trace a circle and another smaller circle in the center. Cut it out. Glue onto the water.
Step 3: For the towel, cut out a rectangle shape in any color of your choice and glue on strips of cardstock in other colors to form a striped design.
Step 4: To make the flip flops, draw two small ovals, a "V" for the flip flop straps and cut it out.
To Make the Palm Tree:
Step 1: Draw the palm tree leaves as shown on green cardstock (I am using the shade Gamma Green™). Draw the bark of the palm tree on the scrap cardboard leftover from the cereal box and glue them together.
Step 2: To make the palm tree stand upright, fold a ½ “ piece of the bark from the bottom and tape it onto the base of the cardboard box.
To Make the Crab:
Step 1: Draw the crab’s legs and claws as shown on red cardstock. I am using the shade Rocket Red™. Then cut it out.
Step 2: Take a small rectangular piece of red cardstock and fold it into a cylinder shape. This will be the body of the crab. Attach googly eyes and draw a little smile.
Step 3: Glue the cylindrical body onto the legs / claws.
Andddd...Done! How fun was that? I hope you enjoyed this project as much as I did.
If you enjoyed this project, and decide to recreate it, be sure to share it with us.
For more fun crafts you can follow me on Instagram @iheartcrafts.ca
Happy Crafting,
Farah Rehmani
Instagram: @iheartcrafts.ca
YouTube: @iheartcrafts.ca


